Assembling the Tank
Refer to the tank cutting guide. You can find a link to download the guide on the green side of this page.
I strongly advise you to make a craftboard model before constructing the tank. The model is useful for a lot of things, including figuring out where to mount the airpump and light and aiding in setting the angle of the front of the tank. It's a lot easier to trim and re-fit a paper model than it is to do the same thing with plastic.
The slope of the front of the tank should be about 70-degrees toward the back. If you have to approximate it, err on the side of a lesser angle. A 65-degree slope is better than a 75-degree slope.
[TIP-02]
 |
The tank fits together in this manner. The back and front sit on top of the base, aligned with the edges of the base. Then the sides will overlap the edges of the back, front and base. |
 |
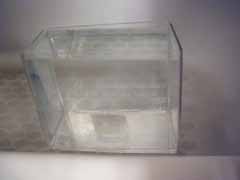
This is what my craftboard model looked like at the end of assembly. There are a few things on top to hold the last side in place while the glue dries. |
If you align a side-piece where it will fit against the front of the tank, you'll see that there's a slight gap between the side and the back. That's where you are going to have to bend the plastic to make the join. The paper model is flexible enough that you can bend it by placing a litle weight on it while it dries as I did in the above picture. The plastic does not bend so easily, so you will either have to fill the gap or use a heat gun to bend it properly.
*The cutting guide includes a template for a stand that you should not use. It is there merely for reference. There is a better way to elevate the tank that you'll see further down on this page. |
 |
Test-fit the model tank in your iMac's case. Attach the top of the case and the front bezel to make sure that it will all fit together. Double-check that the front of the tank will fit flush against the inside frame. [TIP-03] |
 |
In order to achieve the proper elevation you should create a platform for the front of the tank (the rear of the tank will rest on the inside-frame of the iMac's case). Later, you'll make one from plastic, but for now, use some of your craftboard so you can estimate how much elevation is ideal. The base of the tank should sit just a tiny bit below the front edge of the front-frame. |
In the image above, the green arrows point to where the platform should rest -- spanning the two supports in the front of the base. Lay a piece of craftboard about 2-inches deep across the supports. Add more pieces of craftboard until the base of the tank sits just under the edge of the frame, between 1/4-inch and 1/2-inch below the edge of the front bezel. Now you have a model of the platform you will use to support the real tank.
Does everything look good? Then you're ready to roll.
|
 |
Cutting the acrylic properly can be a tough job. You can have it professionally cut or you can cut it with a circular saw or you can cut it like I did with a #24 X-ACTO knife. Here's how to do it by breaking it with the aid of an X-ACTO (work carefully when dealing with edged weapons, please):
|
|
| The plastic sheet should have a protective peel-away wrapper on it. Leave the wrapper on until it's time to cement the tank together. Use a ruler and magic marker to mark your break-lines on the wrapper. [TIP-04] |
 |
Score the acrylic along your break-line using the BACK edge of the X-ACTO knife and a ruler. It takes about 100 strokes to make a good score. [TIP-05] |
Do ONE score-and-break at a time. Start with the longest line that you'll have to cut. [TIP-06] For my iMacquarium tank, I made my first cut at 12 3/8-inches deep and along the entire length of the sheet of 24-inch by 28-inch acrylic, because that made it easier to make successive breaks. Next, put the acrylic on a smooth or carpeted floor with the scored side facing down. Step on it on a side perpendicular to the score line. [TIP-07] With your weight on one end of the piece, lift the other end with both hands and snap it.
With luck, you have made a good break and have a beautiful clean edge. Otherwise, you may have to clean it up a bit. Bumps may be ground down with the Dremel. Rough edges can be filled with thick acrylic cement when you join the pieces. It doesn't have to be perfect.
The trickiest breaks are going to be the shortest ones. Use more strokes to make a deeper score in the plastic. I had a bad break when I tried to make the angled edges along the base. There was a big chunk that didn't snap off, but I ground it down to the break-line with my Dremel.
With all of the pieces cut out, you can start joining them to make the tank. Start with the easiest part -- the right angle at the back.
|
 |
The image on the left shows a corner clamp in use. Carefully line up the back of the tank with the short-side of the base. Remember that the back is meant to sit on the base, flush with the rear of the base. Secure it with two corner clamps. Now use your needle bottle to lay down a few drops of thin acrylic solvent at the inside-junction of the two pieces and leave it to set for a half an hour. [TIP-08] |
After a half-hour, you should have a pretty good weld. Now make it better by laying down a bead of thick acrylic cement along that joint. Give the thick stuff at least an hour to set solidly and the thing should be as strong as if it was a single piece.
Here's how I got the perfect angle for the front: My craftboard model already had the correct angle, so I sat my model down next to my tank when I attached the front and I matched the angles by eye. I gathered a few things to prop up the front and made sure that they would hold it at the correct angle. Then I put a few drops of thin solvent along the bottom edge of the front piece and joined it to the base. I held it vertically for a few seconds and then gently leaned it back to the correct angle where I left it propped for about a half-hour. |
 |
After a half-hour, I added a few drops of thick acrylic cement at either end of the inside of the front seam. Then I waited another hour and carefully removed the props. The front held. I added a bead of thick acrylic cement along the length of the inside-front seam and left it to set overnight. |
 |
If everything is working out so far, it should be roughly level between the back and front of the tank. |
| Connect each side to the front with thin solvent, followed by a bead of thick solvent as you did with the other pieces, EXCEPT do not join the sides to the bottom or back yet. |
 |
You should have a small gap at the back of the tank on each side. If the gap is very very small (like 1/16-inch) then you can fill it with thick acrylic cement and be reasonably certain that it will be watertight. The gap is likely to be greater than that. |
| The way that you fix the big gap is by bending the plastic. [TIP-09] The heated plastic will be too hot to press with your bare hands, so have something long, hard and heat-resistant -- like a length of broomstick -- ready to use as a bending tool to press the side into place. Carry your tank over to somewhere that is well-ventilated and clear of flammable items -- and work on a heat-resistant surface. Leave some free space to lay the heat gun down where it can safely cool when you are done. Remember that it gets hot enough to easily start a fire or quickly burn your flesh to the bone and never point the heat gun at any part of your body (or anyone else's). |
 |
Lay the tank on one side and prepare your bending tool. Turn on the heat gun at a setting around 1000-degrees and give it about 10 seconds to get hot before you point it at the plastic. Move the heat gun smoothly back and forth, keeping it about 1/2-inch above the surface of your tank and pointing it at an angle away from you for about a minute. At this point, the plastic should be soft enough to bend. While continuing to heat the plastic, try pressing gently against the back edge of the side-piece with your bending tool. Don't press in any one spot for too long or it will leave a mark in the side. |
When the side is flush with the back, turn your heat gun off, but continue to press down on the side for another minute or so until the plastic sets in place. It's alright if the side springs a little bit away from the back when it's cool so long as it doesn't take a lot of force to hold it against the back.
Repeat the process with the other side.
That's hot work. Take a break for a little while and let everything cool off!!
When you come back from your break, lay the tank on one side and apply a few drops of thin acrylic solvent to the edge of the back where you want the side to join. Put something heavy on top of the tank to hold the side in place until it dries. When it's dry and you are sure that the side isn't going to move, apply more thin solvent to the inside-seams at the back and base. Give it at least a half-hour to dry and then apply a bead of thick acrylic cement to those same seams.
After an hour, that side should be joined pretty well. Repeat the process with the other side and leave it for another hour.
One last step to making the tank: Make it waterproof. Lay down more thick acrylic cement to every seam. Try to fill every gap. If you are still concerned about it being water-tight after that then you can use the old tried-and-true silicone aquarium sealant in addition to the acrylic cement.
If you use aquarium sealant, make sure to get a tube with an applicator tip. Cut the tip at an angle close to the narrow end and make a few practice-beads on a piece of scrap paper to get an idea of the kind of motion and pressure that will be necessary to make a clean line. The stuff gives off an acidic vapor that can irritate your nose and lungs so work where there's plenty of ventilation. Have some paper towels nearby to clean up messes and to clean your fingers. [TIP-10] After laying down a thin line of sealant at each seam in the tank, draw a finger along the line to push it into gaps and thin the edges to transparency. Clean your finger after smoothing each line and wash thoroughly when you've finished doing the whole tank. Leave it alone for 48 hours to cure. Remember -- the vapors can be harmful! It's best to let it cure outside or near an open window. |
 |
It's time for a water-test. Fill the tank with water, dry the outside thoroughly and leave it for another 24 hours. When you come back, don't rely on your eyes to find a leak. Feel every seam and along the bottom. If it's dry then you have an aquarium. If there's moisture then you have to find and seal the leak. [TIP-11] |
|
Test-fit your new aquarium inside the case with the top on. Now is a good time to make your platform to elevate the front of the tank. If the tank doesn't fit snugly against the front-frame then the height of the platform can be changed or there may be some part of the inner-case that needs to be trimmed. |
 |
This is a picture of my Platform. It doesn't show on the outside so I didn't take great pains to make it look nice. It's just a slab of plastic with a few scraps glued to the top to get the right height. The green arrows point to the parts of the frame that the platform rests on. (Ignore the wiring -- it's part of the "Monster" mod.) |
|
Wash the tank several times with plain water and dry it with paper towels. Use a damp cloth to wipe down the inside and outside of the iMac's shell. Little bits of plastic dust and chemicals left over from the solvents and sealant can kill a fish so do a good job. |
CONGRATULATIONS
You are now the proud owner of an iMacquarium!

